If you’ve just completed a new BMX build and you want to get some good shots of it, either just for yourself or in the hopes of getting it shared by a manufacturer, here are some tips.
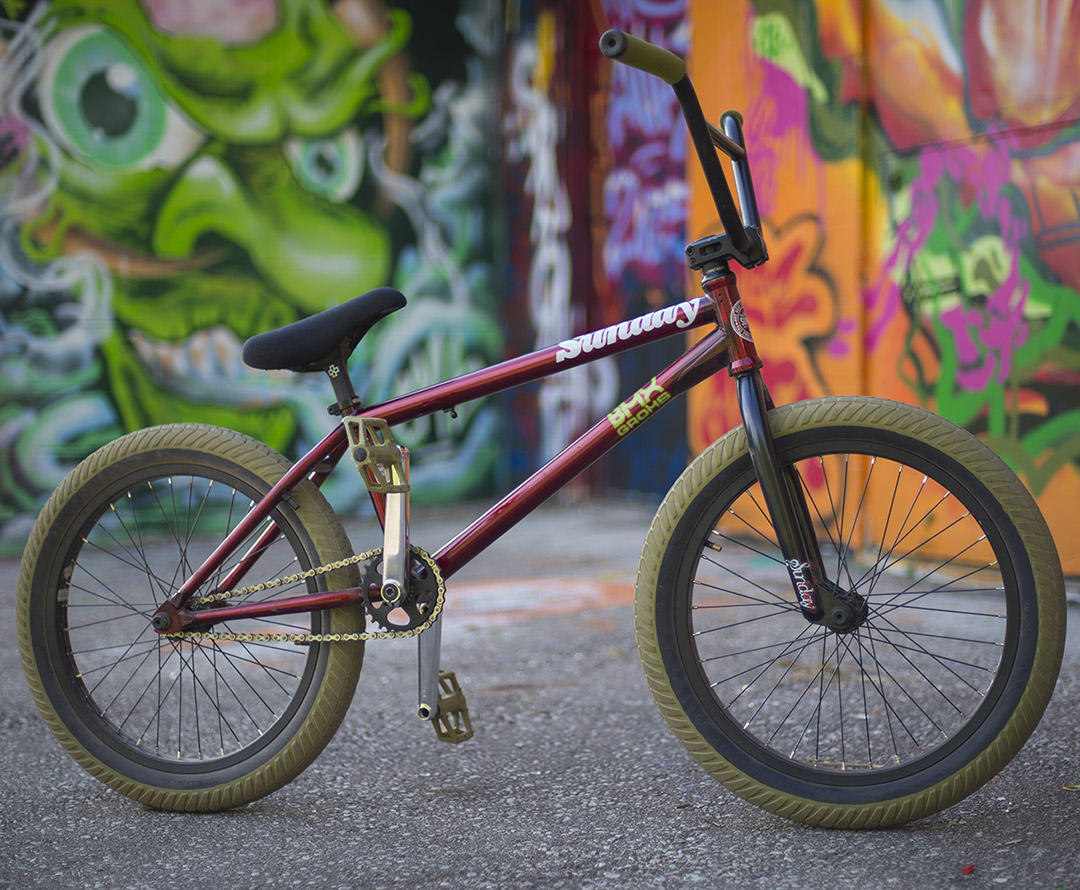
This how-to is based on the above picture, which I shot for the recent BMX Groms Radocaster 20″ Bike Check.
Find a Good Background
The background can make or break your picture. If the background is busy with a lot of detail it could kill your picture right there. So find a background that complements your bike, without being too distracting. When I wanted to take a shot of the Radocaster, I thought of this graffiti spot next to a local skatepark. I chose the wall, which was predominately green, to complement the red of the Sunday. (Look on a colour wheel and you’ll see that red is opposite green making them complementary colours.)
If the Background is too Busy
The background was really still too busy so I used a lens with a really wide aperture to blur out the graffiti. This helps the bike remain the focus of the picture, setting it apart from the background.
Aperture is the size of the gap letting light into the camera, just like the iris in your eye. A small aperture lets in less light, but allows more of the picture to be in focus, from foreground to background. A large aperture lets in more light, but narrows the area in focus called “depth of field”. The depth of field in the Radocaster picture is so narrow that the pedal closest to the camera is in focus, while the pedal facing the wall is actually slightly out of focus.
The lens I used is an old Nikon 50mm, f1.4, manual focus. The mid to higher end Nikon cameras have awesome compatibility which allows you to use old lenses on a modern camera. This particular lens was manufactured in the 70s, but the quality is still amazing.
Making the Bike Stand Up
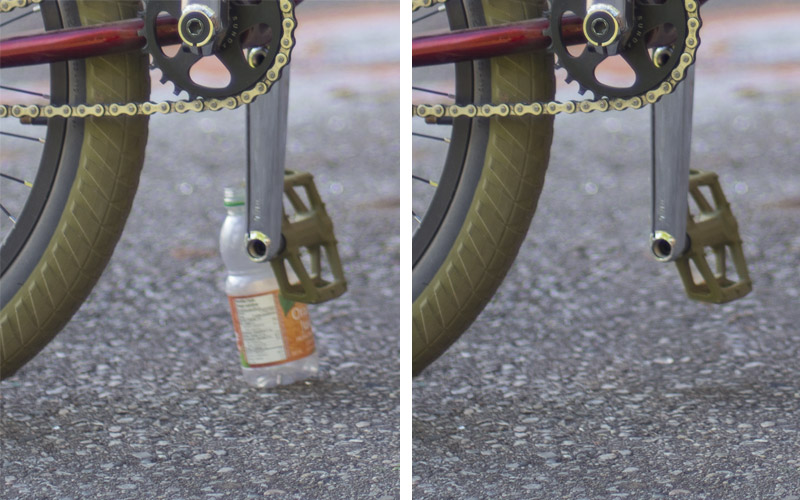
This was the easy part. At first I had the bike leaning against the wall, but the graffiti was too distracting and I decided I needed to get the bike away from the wall. So, I found a transparent drink container, put it under the pedal and got the bike balanced in the right place.
Once I got the image on the computer, it was easy to remove the container in Adobe Photoshop with the cloning tool. I just copied some asphalt from elsewhere with a soft brush. Other photo editing software would have similar tool.
Taking the Picture
Remember, fill the picture with what you want to see, in this case the bike. Crop everything else out.
If possible you’ll want the sun behind you somewhere.
Seeing you don’t need a fast shutter speed and you have a wide aperture letting in lots of light, keep your camera’s ISO fairly low to keep the noise down as much as possible.
In most cases avoid the use of a flash as it will probably blow out the shinny areas of your bike and light the image unevenly.
Take a few pictures at different settings, and overexpose and underexpose to get the best picture.
Here are the actual settings I used for this picture: Shutter speed: 1/1600 sec. Aperture: f/1.4; ISO 200. Aperture priority.
Now go out and shoot.


Recent Comments